It’s no wonder that still organizations using windows server 2003 / windows server 2003 R2 in their infrastructure with different server roles.
With windows server 2008 R2 Microsoft has introduce new great feature called “Windows Server Migration Tools” which will allow administrators to migrate server roles, features, configuration settings seamlessly from one system to another(ex- windows server 2003). Windows server 2012 also includes this feature and in this article I will demonstrate how we can use it to migrate DHCProle to windows server 2012 r2.
Please note, To use this method we need to install this feature in both source and destination servers.
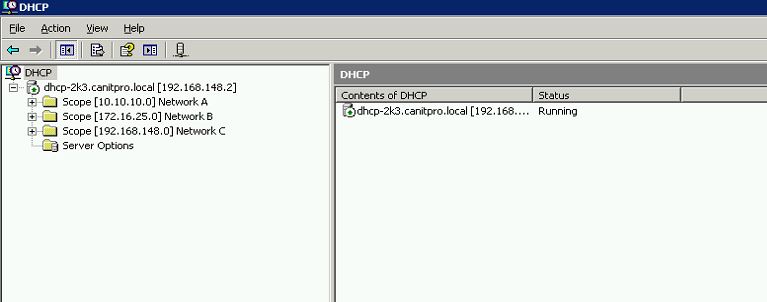
For the demonstration I am using following setup
Server Name
|
Operating System
|
Server Roles
|
Networks
|
dhcp-2k3.canitpro.local
|
Windows Server 2003 R2 Enterprise x86
|
DHCP
|
Network A – 10.10.10.0
Network B – 172.16.25.0
Network C – 192.168.148.0
|
CANITPRO-DC2K12.canitpro.local
|
Windows Server 2012 R2 x64
|
-
|
-
|
Before start the migration process it’s important to consider on following.
1) To migrate the roles you need to log in to source and destination servers as “Domain Administrators”.
2) Before start the migration process make sure source and destination servers’ runs with latest updates and service packs.
3) If the source server runs with multiple network, multiple NIC make sure the destination server also have same number of NIC so it can be server with same network setup.
dhcp-2k3.canitpro.local server currently setup with 3 additional NIC to represent network A,B and C. those have configured with static ip addresses to match with relevant network it belongs to. The DHCP server host different DHCP scopes for each network.
Before we start the process we need to install the following software in windows server 2003(dhcp-2k3.canitpro.local) if it’s not there already.
Install Windows Server Migration Tools in windows server 2012
1) Log in to the Windows server 2012 as Domain Administrator
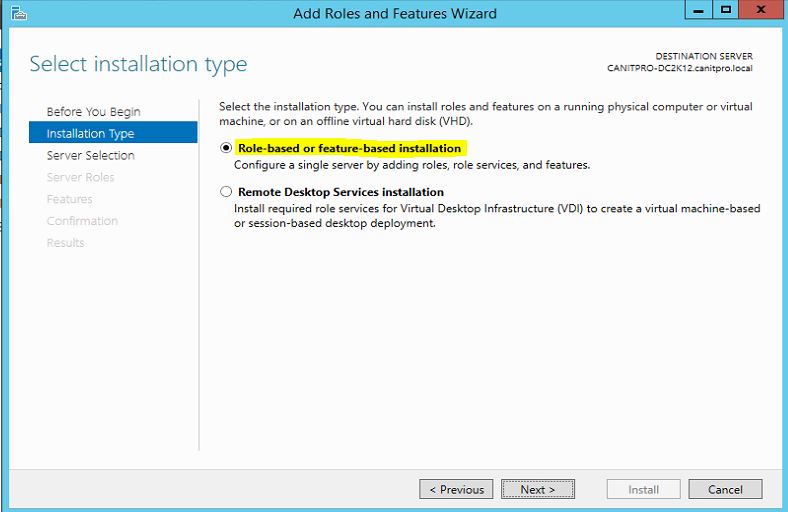
2) Go to Server Manager > Add Roles and Features
3) It will open the Add roles and features Wizard and click next to start the process
4) In next window, for the installation type select “Role-based or feature-based installation” then click next to continue


